How to Repair a Buzzing Valve Solenoid
Buzzing solenoids are usually caused by insufficient voltage reaching the valve solenoid. Unfortunately there are many things that can cause insufficient voltage. To determine what the problem is requires testing for each of the possible causes.
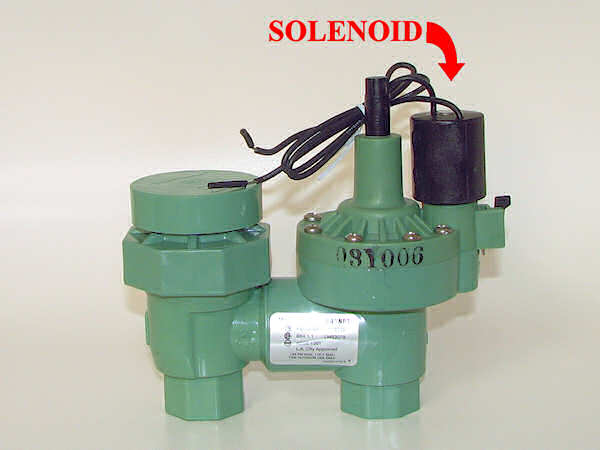
First off, what's a valve solenoid? The valve solenoid is the small device attached to the valve that the wires lead to. It is what makes the valve open and close when an electrical signal is transmitted to it by the irrigation controller. The solenoid is actually a electro-magnet that operates a plunger, which serves as a pilot valve, but that is not important for what we want to do here. It is normal for the solenoid to make noise, it clicks when the valve is turned on or off. It also is normal for a very soft buzzing sound to be heard when the valve is activated, but you should not be able to hear it unless you put your ear near it. If you can easily hear it buzzing, that is not normal.
Solenoid on an Electric Anti-Siphon Type Valve
What's an irrigation controller? "Irrigation controller" is what we in the irrigation industry call the timer that is used to automatically control the irrigation system. The controller has a valve circuit (often called a "station") for each of the valves it operates. It turns on the valves by sending a 24-volt current to the valve from the circuit/station.
General suggestion: Purchase new valves and controllers from a store that will allow them to be returned. Some of the diagnostic routines listed here are trial and error. Purchasing from a store that has a generous return policy will allow you to return an item if you find it wasn't the problem.
Irrigation test equipment can be purchased that will test the controller, valve, and/or wiring. The procedures below do NOT require that you have a tester, but a tester does make it easier. If you don't have a tester(s) and want to look into buying one, see the Reviews - Accessories, Tools, and Other Products section of this website. It has reviews of some valve testing products.
The procedures that follow require the use of an electric valve activator. Most valve testers have a built-in valve activator. If you don't have a valve tester, you can make your own valve activator very easily. For complete instructions on making a simple valve activator see this link: Irrigation Valve Activator.
OK, let's get started.
Test #1
Are there multiple valves operated by the same irrigation controller? Do they all buzz? If not, go to test #2.
- If all the valves buzz when they are turned on, it may just be that the valves you have normally buzz. Some brands softly buzz during normal operation. You might try calling the valve manufacturer's customer service number and asking about it. If the buzzing isn't soft or normal, the problem is probably a bad controller or a bad common wire. (The common wire is usually a white color, and it is connected to all the valves.) If you have an irrigation tester that includes a controller circuit/station output test, use it to check the controller output. If the test indicates a bad controller, replace the controller.
- To check the controller without a tester, disconnect the common wire and one of the valve wires from the controller, connect them to your valve activator, and turn the valve on using the activator. Does the valve solenoid buzz now? If not, the problem is very likely the controller, try replacing it. Buy a new controller from a store that will allow you to return it if it turns out it isn't the problem. If replacing the controller does not stop the buzzing continue to next step.
Test #2
Sometimes there is just a loose or incomplete wire splice or connection causing the buzzing. Turn on the valve using the controller. Go to the buzzing valve and check the wire connections. If they have the twist or screw-on type wire connectors, try tightening them by turning the connector clockwise. If they are a different type of connector, just twist the wires around a bit, or push them firmly into the connector to see if you can make a better connection. If the buzzing stops then you simply have a bad wire splice. Turn off the valve using the controller. Remove the old splice and make a new splice using a NEW connector. Be sure the splice is water-proof or your next problem will be a rusted-out solenoid! Water can be pulled up into the solenoid from a non-waterproofed splice. The water is pulled through the tiny spaces between the multiple wire strands by capillary action. Not properly water-proofing of the wire splices is the #1 cause of solenoid failure! Taping the splices with electrical tape will NOT sufficiently water proof them. Use special water-proof connectors that you can buy at any hardware store.
If messing with the splices doesn't work, disconnect the wires completely from the valve (you may have to cut the wires.) Strip some insulation off the end of the valve's wires. If you have a valve tester, connect the tester to the valve and test the valve. If the test shows a bad solenoid, replace the solenoid or the valve.
If you do not have a tester (or if the tester indicted a good solenoid) connect the valve activator to the wires. Turn on the valve using the valve activator. The valve should open and there should not be any buzzing.
- If the valve does not buzz when activated the problem is either that the wires from the controller to the valve are bad, or possibly the irrigation controller itself is bad. Proceed to test #3.
- If the valve still buzzes when turned on with the activator, the solenoid on the valve is dirty or bad. Turn off the water, then take the solenoid off the valve and clean both the solenoid and the area it came out of on the valve. Most solenoids are connected to the valve with threads, just unscrew the solenoid to remove it. The solenoid has a spring loaded plunger in it, watch that it does not pop out when you remove the solenoid.
With the solenoid removed turn on the water for a few seconds to blow out the passages in the valve. When you do this water should spray out of the area where the solenoid was (protect your face, often bits of sand, plastic, or metal will fly out with the water.) If water doesn't forcefully spray out of the valve, turn off the water and check that the tiny passages in the valve lid under the solenoid are not blocked. Use a small piece of wire to push any trash caught in the passages out, but be very careful, do not scratch the sides or top of the passages. Do not try to clean the passages by drilling them out with a drill bit. You probably will need to remove the lid from the valve to clean the passages. Most valve lids are held on with screws (the lid in the photo above has numbers stamped on the side of it and is held on with silver screws), however, some lids screw off like the top of a jar. If you do remove the valve lid, make a drawing of how all the valve parts under the lid fit together as you remove them, so you can reassemble it! Clean all the parts and put the valve lid back on after you are done. If you leave even a single grain of sand inside the valve, it may cause the valve to fail and then you will have to reclean it!
Clean the solenoid, and check the plunger. If you push on the end of the plunger it should easily slide into the solenoid. It should spring back out when released. If the plunger does not move easily or the spring does not push it back out, replace the solenoid. In my experience trying to clean or repair the plunger doesn't provide a long-term fix. Make sure the area of the valve lid under the solenoid is still clean, then put the solenoid back onto the valve.
Now try testing the valve again using your tester/activator. If it still buzzes the problem is a bad coil in the solenoid and it is not repairable. Replace the solenoid or the whole valve. If the valve is more than 10 years old and isn't a top quality valve, you probably should just replace the entire valve, it is getting pretty old.
Test #3
Go to the controller and disconnect the common wire and the valve wire for the valve that buzzes from the controller.
If you have an irrigation tester that includes a controller circuit output test, use it to check the controller output on each circuit/station. If you find bad circuits, mark them as bad and use other circuits if you have extras. If you don't have any extra valve circuits you will need to replace the controller.
If you don't have a controller circuit/station tester, connect your valve activator to the valve wires at the controller and use it to turn the valve on.
- If the valve is still buzzing, you likely have a bad wire or wires between the controller and the valve. Replace the bad wire(s) or use a work-around solution. (See below.) If you decide to replace wires, before you dig trenches or string new wires through difficult to access locations like a crawl space or an attic, just lay down temporarily wires between the controller and valves. By running temporary wires between the controller and valves you can confirm that bad wires are the problem and also determine which wires are bad. Wire is expensive, so for temporary wires I suggest buying a packaged wire rather than a custom-cut length off of a large spool. Don't cut the wire, just leave any extra wire coiled while doing the test. Strip off just enough insulation on the ends to make your connections. Most stores will take packaged wire back as a return if you haven't actually cut it to a shorter length. Simply disconnect the old wires and hook up the new temporary wires in their place. Once you have identified which wires are bad you can cut the wire to the proper length and install the new wires in their permanent position. If the valve still buzzes with a new wire, it's time to replace both the valve and the controller with new ones, if you haven't already.
- If the valve does not buzz when activated with your valve activator, you probably have a bad controller circuit/station. Try swapping the valve onto a different controller circuit. At your controller, disconnect the wire for one of the valves that is not buzzing, and hook the wire for the buzzing valve up to that circuit. If the valve solenoid still buzzes after being switched to the new circuit, it means the wire to the valve is probably bad. See the procedure for replacing the wires in the paragraph above. If it doesn't buzz anymore, it means the controller circuit that the valve was previously connected to is bad. If you have a spare circuit on the controller, you can use it to control the valve. If not, you will need to replace the controller.
Work-Around Solutions for Bad Wires
If you have bad wires that you don't want to replace there are a number of products made to provide a solution using the wires you have.
2-Wire Controllers. If you have at least 2 good wires you can use a controller that utilizes only 2 wires. These controllers hook all the valves up to the same 2 wires, and a special decoder is installed at each valve. The controller turns on the valves using a signal sent to the decoders.
Wireless Controllers. There are some controllers that use wireless transmitters to control the valves.
Battery & Solar Powered Controllers. These controllers are installed at the valve location and are powered by batteries, sometimes with a solar battery charger.
Double Up Devices. These are devices that allow you to install two valves on the same wire. They each work slightly different so you will need to do a little research to figure out which would work best for you.
End