How to Fix Sprinkler Heads That Do Not Completely Pop-Up
Sprinkler Heads are not Seating:
Here's what to do if some of the pop-up style sprinkler heads on your landscape sprinkler system do not fully pop-up. Sometimes none of the heads fully pop-up, sometimes only one or two are partially popping up and the rest are working correctly. This is a fairly common problem, but there are a number of possible causes to examine. This article will take you step-by-step through the process of finding the problem and fixing it. Let's start with a couple of photos to help familiarize you with the names of the sprinkler parts used in this article:
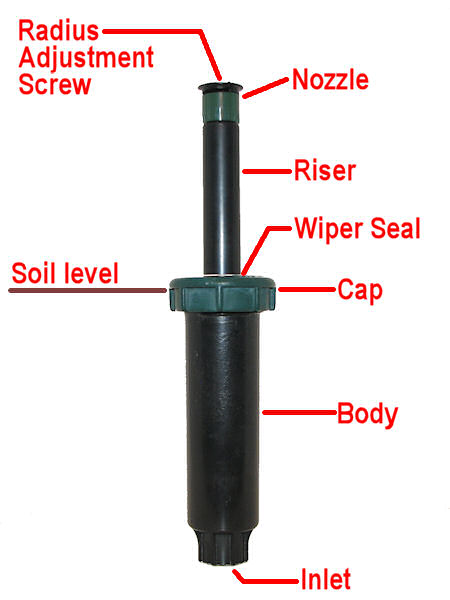
Typical Modern Pop-Up Sprinkler Head
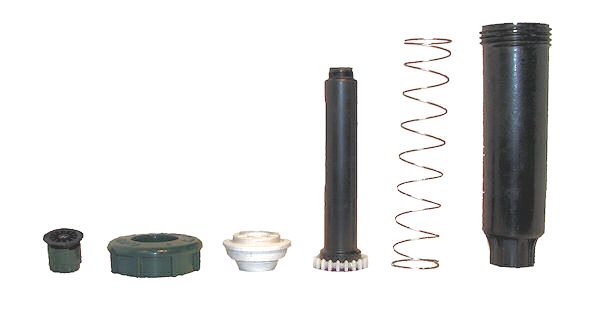
Parts of a Typical Pop-Up Spray Sprinkler
From left to right:
Nozzle, Cap, Wiper Seal, Riser, Retraction Spring, Body
Step-by-Step Instructions:
- Check all the valves to make sure that none of them are partially closed. A partially closed valve will reduce the water pressure and water flow to the sprinklers and this will cause them to not fully pop-up.
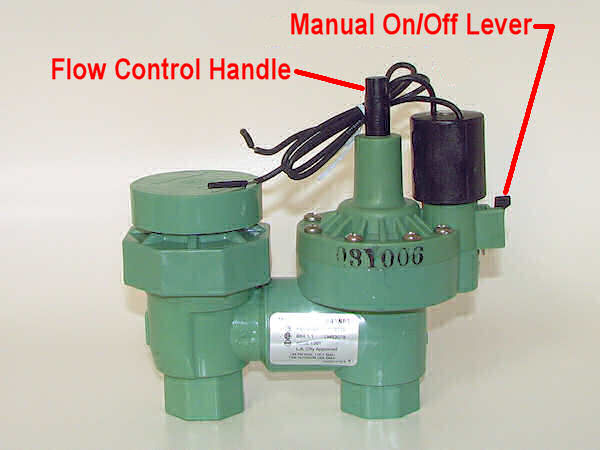
Typical Solenoid Valve Controls
- Many electric solenoid valves used to operate the sprinkler circuits have a flow control handle, knob, or screw on them that allows the valve to be manually closed or throttled. If your valves have a flow control, check and make sure it is completely open. The flow control on most valves is on top of the valve and centered in the middle of the valve. Turn the handle counter-clockwise to open it. If water starts coming out, STOP turning it and retighten it! If water comes out it is a manual bleed screw used to manually open the valve, not a flow control. For the location of the flow control check the valve owner's manual. (If you don't have one, search for a owner's manual at the valve manufacturer's website.) Many low-cost valves do not have a flow control.
- Try manually opening the electric solenoid valve. There should be a lever (often labeled with "open -- close" on it) or small bleed screw on the valve that allows you to bypass the solenoid and open the valve. If there is a bleed screw open the screw until a small stream of water comes out, but do not remove the screw completely, it is very hard to get back on if you remove it. If the heads pop-up fully when the valve is manually opened then the problem is inside the valve. Clean the valve. See How to Repair a Irrigation Solenoid Valve.
- Check any other valves to make sure they are fully open. There may be a shut-off valve at the point where your sprinkler system connects to the house water system, check it. There may also be a valve where the house water connects to the water company pipes if you have a municipal water supply. Look for any valves that may be partially closed. I was called to consult on an apartment complex where the water supply had suddenly lost pressure. The sprinklers were not popping up, and when the sprinkler system was turned on the showers in the 2nd floor apartments stopped working! They had looked and looked for a problem. I traced the problem back to the street, so we called the water company. They discovered that the pipes in the street had been worked on a few days earlier. In the process they had partially closed a valve on the pipes, and forgot to reopen it!
- Next, turn on a single valve that has heads that will not pop up.
- Sometimes a grain of sand will wedge in the gap between the pop-up riser and the cap of the sprinkler, causing the sprinkler riser to jam part way up. Press the pop-up riser on the sprinkler head down firmly, but gently, with your foot so that it is pushed all the way back down into the body (you may get wet doing this!) Then release it so it pops back up. Repeat this 4 or 5 times to loosen and flush out any sand grains caught between the riser and the cap.
- Check for excessive blow-by of the sprinkler riser. When the riser comes up a small amount of water squirts out of the gap between the riser and the cap, this is called blow-by. A small amount of blow-by is normal, it lubricates the seal and helps clean dirt and grass off of the riser as it goes up and down. To check the blow-by have someone turn on the sprinkler valve while you watch the riser on the sprinkler as it comes up. A little water gurgling out between the riser and cap is normal. A lot of water coming out between the riser and the cap is not normal. To determine what is normal compare several sprinklers, looking for one that squirts considerably more water than the others, indicating excessive blow-by. If you are still not certain, replace one sprinkler with a brand new sprinkler and then compare it to the others. If the sprinklers have excessive blow-by they should be replaced. Be sure to use the same brand and model of sprinkler heads for replacements. Different brands and models are NOT compatible with each other. Each manufacturer uses different water application rates for their sprinklers and you will get over-watered and/or dry spots if you mix brands together.
- No water should come out from between the riser and the cap when the riser is in the fully extended position. Turn on the sprinklers and check each one for leakage between the riser and cap. Make sure the riser is fully up when you check. If the riser does not come up all the way, pull it all the way up with your hand. Hold the riser up while checking if it will not stay up by itself. Check all the sprinklers, as a leaking sprinkler near the valve can cause a different sprinkler that is farther from the valve to not fully pop up. If there is leakage between the riser and the cap when the riser is completely up, the riser seal is bad, the riser is scratched, or the cap is scratched. Replace the sprinkler.
- Turn off the water and try pulling up the riser on the sprinkler with your hand. There will be resistance due to the retraction spring, but the riser should move easily up and down without catching or hanging up. Sometimes the riser on the pop-up and the seal around it become badly scratched from sand particles. The surface becomes so rough that it causes the riser to not move freely in and out of the sprinkler body. The only solution for this is to replace the sprinkler. If you try to use sandpaper on the riser to smooth it out you will just create excessive blow-by, so don't waste your time.
- Has your water pressure dropped? This often happens when new construction occurs nearby and the water system must supply water to more homes or businesses. If you have your own water supply with a pump the water pressure and flow may drop as the pump gets old and worn out. When the water pressure drops, the sprinklers may no longer pop-up fully. If you get your water from a water provider, call them and ask if the water pressure in your neighborhood has dropped recently. If it has, ask if this is just a temporary problem that will go away in a few days. (Often the water pressure drops temporarily when repairs are being made to pumps or pipes.) Often the water pressure in municipal water systems will go up and down depending on time of day or day of the week. Often water pressure is low between 5-8 AM when lots of people are taking showers and watering lawns. Try changing to a different watering time or day to see if the water pressure is higher (if you ask them, the water supplier can often suggest a good time when pressures are higher.) If you have a pump of your own, like in a well, then call your pump service company and have them check the pump out. If you discover the water pressure has permanently dropped you have a serious problem. Your sprinkler system was apparently designed for a higher water pressure that is no longer available. Your choices are to add a booster pump to create more water pressure for the sprinkler system or to modify the sprinkler system to use less pressure.
- Booster pump: If you add a booster pump I strongly suggest you purchase a pre-assembled pump system from a sprinkler supply specialty store. These units come with everything you need, you just pipe it to your system and plug it in. Pumps are tricky, you can waste a lot of money in a hurry if you do it wrong. There are a number of pumps sold through hardware and catalog stores that are called "sprinkler pumps", most of these are designed to run a single sprinkler head on a hose. I get a lot of sad stories from people who bought one of these and then discovered it wouldn't do the job. Then they sell it to someone else on Ebay, and the cycle repeats itself. Save yourself a lot of grief and buy a packaged complete pump system that includes the right size pump with all the starters and safety switches you need. Warning: some municipal water systems do not allow the use of booster pumps, check with your water provider.
- Modify sprinkler system: To modify the sprinklers to use less pressure and water you will need to reduce the number of sprinklers on each valve circuit. Remove a sprinkler from the valve circuit(s) having problems and install a plug in the pipe where it was connected. Turn on the valve and test to see if the sprinklers now work correctly. If they still do not pop-up and spray correctly go back and remove another sprinkler, then test again. Continue removing sprinklers until the other sprinklers start working properly. Now you will have to reinstall those sprinklers you removed. You will need to install a new valve for them and install new pipes to them from the valve, creating a new valve circuit. Yes, I am aware that is a lot of work!
The steps above should have identified the problem and fixed it. Now would be a good time to give the sprinkler system a full tune-up. See Sprinkler System Tune-Up.