Water Hammer and Air in Pipes
Water Pipe Noise and Things that go Bump in the Night.
Is your sprinkler system making odd noises? That sound may be water hammer, but then again, there are other things that create noise in water pipes. Air in the pipes can cause them to make sounds which are easily confused with water hammer. In a few cases I have dealt with, the thumping turned out to be loose pipes striking each other. What I will attempt to do in this tutorial is take you through a few steps to determine the source of the sound and then suggest some remedies. I will start with the easy fixes (that are, unfortunately, less likely to work) and then move on to tougher ones (which are more likely to work.)
Many years ago I was called in to consult on a large high school irrigation system that was having water hammer problems. The water hammer was literally blowing apart the system. Two guys were working full time just repairing the pipe breaks! They had tried for months to fix it and numerous irrigation equipment salesmen had checked it out. They had spent hundreds of dollars on adding additional equipment which was supposed to cure the problem, such as air vents, and a "huge water hammer arrester". But the problem continued. We looked at the original plans for the system and the problem was almost immediately obvious. The water was flowing through the system backwards! Apparently someone decided to move the well location from one end of the property to the other. They didn't bother to redesign the sprinkler system, they just ran the water through it from the other direction. Unfortunately, that meant the water started out in the smallest pipe in the system. I suggested they add a second pipe next to the small one that was restricting the flow. They did, problem solved, no more water hammer! They could have saved thousands of dollars in repair work and unneeded equipment. The moral of the story is always look for the source of the problem before you try to fix it.
A quick disclosure before continuing- these explanations are intended for the average Joe. All you physicists and engineers out there need to relax. I realize these are not perfectly accurate scientific explanations. There are other websites that dwell into the nitty-gritty details with lots of formulas that will make your day. You'll find one at http://www.lmnoeng.com/WaterHammer/WaterHammer.htm. It has lots of formulas! The majority of the people reading this do not want to deal with scientific theory and mathematical problems, they just want to know how to quiet things down so they can sleep at night!
Some of the solutions I mention in this tutorial may not meet plumbing codes in some areas. Plumbing codes and standards vary from city to city. It is always best to check with local building department officials before modifying the plumbing inside your home.
Identify the Problem
The first thing to check is the water pressure in your house. You can buy a pressure gauge for this at most hardware and home improvement stores. Attach the gauge to the cold water outlet for your washing machine. (Some water will spill out of the washing machine hose when you remove it, so hold a towel under it.) Turn off the water for anything in the house that uses water. This includes all the faucets in the house, ice makers, reverse-osmosis type water purifiers, and make sure the toilets aren't filling. Any water running in the house may cause an inaccurate reading on the gauge. Turn on the water faucet that the gauge is attached to, and then read the water pressure on the gauge. That's all there is to it!
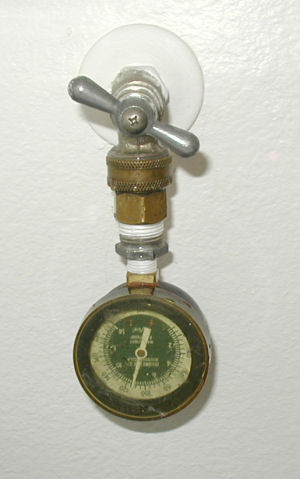
Pressure Gauge attached to laundry outlet.
After the test turn off the water and disconnect the gauge. (Some water will spill out of the gauge when you remove it so hold a towel under it when you remove it.) The pressure reading you get from the gauge should be 60 PSI or less. Pressures higher than 60 PSI can be the source of the noise problem. But just as important, water pressures higher than 60 PSI can cause a lot of other plumbing problems too. So if the pressure is higher than 60 PSI you need to fix that first. The solution for high water pressure is to install a pressure reducing valve on the pipe that brings water into your house. (Pressure reducing valves may also be called "pressure regulators" or "pressure regulating valves" depending on the brand of valve and where you buy it.) If you already have a pressure reducing valve it is probably broken. They tend to break or wear out after about 10-15 years of service. You can try adjusting it to see if it is just set wrong, however be prepared for the need for an immediate replacement if you do this. If one of the parts inside the pressure reducing valve is broken, the valve may jamb closed when you try to adjust it. If this happens you will need to replace the valve immediately! To adjust the pressure on the valve you turn the bolt that protrudes from the bell shaped part of the valve (see photo below). When selecting a new pressure reducing valve make sure you get a brass-body model similar to that shown in the photo below. Warning: installing or replacing a pressure reducing valve involves a moderate to high level of plumbing skill, you may want to hire a plumber for this if you are not experienced with plumbing. Typically it requires cutting pipes. (Yes, the pressure on the gauge in the photo above is 112 PSI. The pressure reducing valve on my house was broken when I took the photo. So it happens to all of us.)
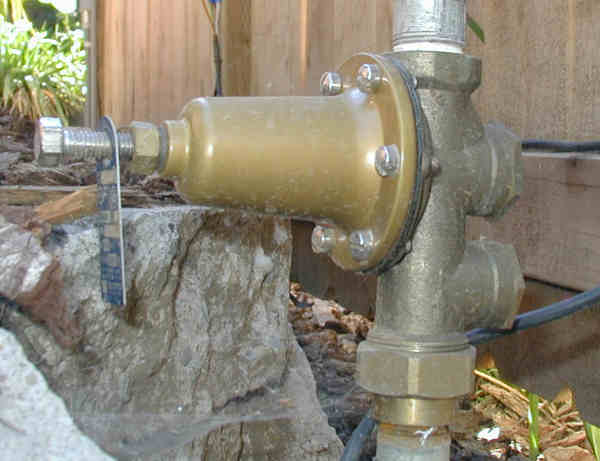
Pressure Reducing Valve/ Pressure Regulating Valve/ Pressure Regulator
No, it's not installed upside down. This particular valve is installed on a pipe where the flow is going up.
If the water pressure is less than 50 PSI, then the next thing to check is for loose pipes that may be bumping each other, making noise. In the case of loose pipes the sound will usually become much louder as you approach the source. In one instance a tutorial user wrote me to say that he discovered that the problem was a backflow preventer that wobbled when the irrigation system was running and bumped the side of the house. So start by listening for a sound source and looking for anything loose. It would be frustrating to spend tons of money trying to fix what you thought was a water hammer problem only to discover the fix was to stuff a 50 cent piece of foam between two pipes!
When water moves through a pipe it makes noise. Although it might seem to be a smooth flow, the water inside the pipe actually churns and tumbles as it moves through. The normal sound of water moving through pipes is a steady, even sound. The best way to know what it sounds like is to go turn the bathtub water on full blast, then go to other rooms of the house and listen. (Don't let the tub overflow!) Some newer bathtubs don't use enough water to make the pipes "sing" so you may have to turn on several faucets at the same time to create enough volume. The sound you will hear is the normal sound of water flowing through the pipes. If that is the sound you are hearing that is bothering you, then unfortunately, there is little you can easily do about it. Water makes more noise as it moves faster through the pipes. Replacing the pipes with larger pipes will reduce or even eliminate the noise you can hear. But that is a huge undertaking.
A continuous thump, thump, thump noise, consisting of evenly spaced thumps when the water is running may be caused by a under-size water meter. The noise may also be a tapping sound. The noise may appear to come from the water heater as the tank amplifies the sound. Check the water meter, you will likely hear the noise coming from it. The solution is to install a larger meter.
A pipe that is changing temperature will clunk as it expands or contracts. The noise results from the pipe suddenly shifting position. This is common inside a house when hot water is turned on. The hot water flows into the cold pipes causing them to expand. But this temperature change related noise may also occur in less expected times and locations. For example a water pipe that supplies irrigation water may pass through an attic or crawl space where it may get hot on a warm day. When the irrigation comes on cold water is pulled into the pipe, causing it to contract and make noise. The key to pipe expansion/contraction related noise is that the clanking noises are not uniformly spaced, they occur randomly. The noise is generally noticeable but not loud. The noise occurs soon after water is turned on someplace and stops after a minute or two as the pipes reach the new temperature. Installing insulation on the pipes may help reduce the noise. Loosening straps that hold the pipes in place may also reduce the noise by allowing the pipe to slide easier as it expands and contracts. Often there is little you can do to completely eliminate this type of noise and it is something you will just have to live with.
Air in the pipes can cause an awful lot of noise! It can be much worse to listen to than true water hammer. The noise of air in the pipes is often a vibrating sound or a rapid ticking sound similar in pace to a machine gun firing. (At least what one sounds like in the movies.) Air in the pipes can be really difficult to get rid of. Air tends to get trapped at high points of the pipe system where it is difficult to push out. As the water moves in the pipes it breaks the pockets of air up into tiny bubbles. Then the water flows past the bubbles, leaving the air still in the pipe. These tiny bubbles moving around, and expanding and contracting, are that rapid vibrating sound you hear. (Everyone who has been to Hawaii knows how annoying the sound of Tiny Bubbles can become after a few repetitions.)
Water hammer can also be the source of the noise. Water hammer can be a big thump that shakes the house, or a series of banging noises starting with a loud bang followed by several "echoes". The best way to identify if the noise is water hammer is to ask yourself "when does it happen?" If the noise occurs when you open a valve or a faucet, it is probably air in the pipes. If it occurs when a valve closes or the washer changes cycles, it is probably water hammer. If it occurs when a pump starts, it could be water hammer, air in the pipes, or both. Although opening valves can sometimes create water hammer, this typically only occurs with valves larger than 3" in size, and even then it is reasonably rare. In fact, in my 20+ years in the business I have never actually seen water hammer caused by a valve opening.
So here's your noisy pipe checklist:
- Noise when a valve closes = water hammer.
- Noise unrelated to valve opening or closing = air in pipes or loose pipes moving around and striking objects.
- Noise when a pump starts = water hammer and/or air in pipes.
- Loud single thumps or multiple quick bumps, then no noise. This tends to be water hammer.
- Vibrating and prolonged noises tend to be air in the pipes.
- A continuous, uniformly spaced tap, tap, tap noise when water is running may be caused by an under-size water meter.
- As hot water flows into a cold pipe, or cold water into a hot pipe, the pipe will expand or contract and make noises. This will create a clunking noise that goes away in a minute or two once the pipe fully changes temperature.
Air in the Pipes
There are only two ways I know of to get the air out; push it out by increasing the water velocity (speed), or open the pipe and release the air.
To push the air out you need to temporarily increase the water velocity to the point the water "sweeps" out the air bubbles. To increase the velocity you need to turn on as many water outlets as possible. That creates a high water demand and the water velocity goes way up. As the water rushes through the pipe the trapped air is swept along with it and out of the pipe.
If the air is in the irrigation mainline (a mainline is the pipe upstream of the circuit control valves) you should be able to increase the velocity by manually opening two or more of the circuit valves at once. Most electric irrigation valves can be manually opened by twisting a lever under the valve's solenoid (the thing the wires go into), or by partially unscrewing a bleed screw on top of the valve. Do not remove the bleed screw, just slowly turn it until the valve opens. Open all of the valves at the same time if you need to. Let the water run for a while to give it a chance to push all the air out. When you close the valves close them one at a time. Closing them all at once can cause a pressure surge that can damage your irrigation system. Don't be surprised if the valves take a long time to close, this is fairly normal when more than one valve is opened at the same time. If the electric valves won't close, slowly turn off the main water supply to the irrigation system, wait one minute, then slowly turn it back on. They should now be closed.
If the noise only occurs when an individual sprinkler valve (always the same valve) is opened the air may be in the lateral pipe (the pipe downstream of the valve.) In that case you will need to temporarily remove some of the sprinkler heads on that valve circuit in order to increase the water velocity. Remove the 3 sprinkler heads furthest from the valve and then open the valve to flush out the air. If that doesn't get it out try removing more sprinklers. After the air is flushed out, put the sprinkler heads back on. If that fixes the problem temporarily but it returns after the next time you irrigate, then the problem is that the water is draining out of the pipes through the sprinkler heads after each irrigation. This is probably because one or more sprinkler heads are lower than the others. When the water drains out, air gets back into the pipes. To prevent this you need to install "anti-drain check valves" at the inlet of each sprinkler head. The anti-drain check valve is a small spring-loaded check valve. The check valve holds back the water so it doesn't drain out. It does not effect the performance of the sprinkler head noticeably. Many sprinkler heads are available with this feature built-in to the sprinkler. Some brands also have retrofit kits available that allow the check valves to be easily installed in existing sprinklers. The built-in anti-drain check valves do not effect the performance of the sprinkler at all.
If the air is in your household pipes try turning on all the faucets in the house and then flush all the toilets. Again, give it a few minutes to push that air out. If you know where the water supply comes into your house turn off the faucets starting with the one closest to the water supply entry point, then close them one at a time moving away from the entry point. As you come to a toilet when you are moving through the house turning off faucets, flush it again, then wait two minutes before closing the next faucet. Don't forget the faucets on the outside of the house!
If the above procedures didn't get the air out...
Next try a water hammer arrestor. This often doesn't work with air problems, but it's worth a try. At your local hardware or home store look for a pre-packaged water hammer arrestor that attaches to a standard washing machine cold-water outlet. The ones I have seen come in one of those clear plastic display packages, and look like a copper tube with hose connections. Check the return policy of the store before you buy it, if you can, buy it someplace where they will take it back if it doesn't work. Make sure you keep all the packaging. Install it per the directions on the package. If it doesn't work, remove it and return it.
If the air can't be pushed out, and the water hammer arrestor didn't work, you will need to find where the air is trapped in the pipe and "open the pipe" to release it. Air rises above water, so the air is likely trapped in a high spot in the piping. Try to visualize how your irrigation system is laid out. Are there any obvious high points where air might be trapped? If you can identify a likely high point turn off the main water shut-off valve and open a faucet or valve to release the water pressure. Then cut the pipe at the high point and install a tee on it with a small valve on the tee outlet. A compression type tee may be easier to install. A 1/2" valve, or even a smaller one if you can find one, will work fine for the valve. Do not use a gate valve! Gate valves tend to leak easily. Ball valves work good. See the drawing below. The valve needs to be on a short nipple, a few inches above the pipe as shown. (Stop snickering, in the irrigation business a nipple is the name of a short length of pipe. If you really like to giggle at odd names read the glossary.) Close the faucet and turn the water back on. The air will rise to the highest point which is the short upright nipple under the valve. You can then open the valve just a little bit to let the air escape. Some water is going to come out too, so be prepared for it to squirt! After releasing the air put a plug in the outlet of the valve for safety.
Sometimes you will get all the air out and everything will be fine for a while, then without warning, the air noise will return. This is because the water coming into your house or irrigation system sometimes has air trapped in it. Have you ever filled a glass of water from the kitchen faucet and noticed it was a milky white color? But after sitting for a while it turns clear. That white color most likely was caused by tiny bubbles of air in the water (at least I hope it was!) This air can get in the water lots of ways, it is fairly normal and doesn't by itself mean your water is polluted or not drinkable. But this air does tend to rise out of the water when the water is sitting in your pipes, and it can form an air pocket in the pipe after a while. This causes the wonderful air noise you enjoy so much to return. If this happens often you can add a "continuous venting" type air vent in place of the valve in the drawing above. The air vent needs to be the type that releases air while under pressure. The type of air vents that are made for most irrigation systems will not work. The type you want has a float connected to an arm that uses a lever to open and close a small valve that allows the air to escape. The correct vent type is often called an "air eliminator" or "air relief valve." Look for that term "continuous venting". Most plumbing supply stores will have one. A 1/4" size one should work fine.
Water Hammer
True water hammer is essentially the sound of a "water wreck" occurring. It happens when moving water suddenly changes speed. Water hammer can be caused by a pump starting or a valve rapidly opening, however in the vast majority of cases it results when a valve closes. Sometimes you can create it simply by closing a faucet very fast. Many single lever household sink faucets will allow you to slam them closed fast enough to cause water hammer. Closing the same valve slowly will not cause the water hammer. However, more often the valve causing the problem is an automatic valve such as is used on an irrigation system. Since most dishwashers and washing machines use the same type of valves as irrigation systems, you will sometimes get water hammer when the dishwasher or washing machine fill valve closes. So for this tutorial I am going to focus on water hammer caused by closing valves. Even though these so-called "electric valves" appear to be powered by electricity, they actually use water pressure as their major power source. The electric solenoid on the valve operates a tiny "pilot valve". The water flow from this tiny valve is then used to open and close the bigger valve using hydraulic pressure. This works well, but leaves a minor engineering problem. It is very hard to get these valves to close slowly! Engineers have made some great progress but they still haven't fully defeated what I call the 80/20 problem. The 80/20 problem is that valves close slowly until they are about 80% closed, then they tend to snap fully closed in a millisecond! This causes the water in the pipes to suddenly stop moving. Now we all know the story of Jack and Jill, and the reason Jack fell down is that water is heavy (and perhaps Jack was paying too much attention to Jill , and not enough to his bucket, but I'm getting off-track here.) A column of water moving through the pipe at 7 feet per second carries with it a tremendous amount of weight and momentum. While it's not a perfect example, the one commonly used is to think of the water in the pipe as a big freight train going through a long tunnel. The valve closing is like blocking the end of the tunnel with thousands of tons of rock. When the train slams into the blocked end of the tunnel there is going to be one horrific crash! The faster that train is moving, the worse the crash will be. Thus the problem with water velocity in the pipe. The faster the water is moving, the worse the crash is going to be when the valve closes. That crash is the cause of a big thumping noise when the valve closes. Secondary thumps that follow are essentially "echoes" in the pipe.
Now that thumping sound would be bad enough, but a unique property of water makes the problem much worse than just an annoying noise. Water is essentially non-compressible (it compresses a little bit, but not much.) So all the energy it carries with it when it slams into the closed valve has to go someplace. So the energy creates a brief, but enormous, spike it the water pressure in the pipes. This spike can easily double or triple the water pressure in your system. The pressure spike occurs so fast that a standard pressure gauge will not even register it. But this increased water pressure doesn't just hang around the vicinity of the valve. It passes as a shock wave back through the pipe at (almost) the speed of sound in water, seeking a way out. This creates stress on the pipe, and if there is a weak point in the piping the pressure surge will find it. So each time the water hammer occurs it is putting stress on the pipe, which weakens the pipe. If you hear the noise in your house, then the pipe in the house is being damaged, even if the source of the surge is someplace else. It shock wave travels through the water in the pipe. So what kind of damage does it do? Consider a standard rubber balloon. You blow up the balloon then let the air out. You do this again and again. Each time the balloon gets stretched a little more and weakens. After being blown up many times the balloon simply bursts. You didn't blow any more air into it than before, it just was weakened by the constant expanding and contracting. The pipes in your home and irrigation system stress in a similar manner when exposed to these pressure spikes. Where is the most likely weak spot where it will break? In my experience the first pipe to go is in the house, not the sprinkler system. It is often the tube connecting a toilet or sink to the household water system, which is usually a hose or thin wall pipe. The result is a flooded bathroom. If you made an error in installing the irrigation system and forgot a clamp or didn't get a good strong glue joint you may see a leak there. A small pinhole leak in plastic irrigation pipe or hose very quickly enlarges to the diameter of a pencil. Points where the pipe changes direction also take a beating as the pressure surge wants to continue in a straight line rather than go around the bend. There is one last frustrating problem with water hammer, which is that the sound you hear often appears to be coming from someplace other than the point where the water hammer was created. This is because sound travels very well through the pipe and the water in it. So you can't rely on your ears to find the source of the water hammer.
Water hammer is influenced by three variables, understanding these variables will help you find the source of your water hammer problem.
The first variable is the length of the pipe the water is traveling through. We can't do much about the length of your pipes, assuming that you can't move your house closer to the water source. But it is an important factor in creating water hammer, so it is useful to take a look at it, especially as it relates to the pipe size. For example, in some situations you can force a high rate of flow through a small pipe without problems, provided the length of the pipe is short, say, a few feet. The shorter the pipe, the smaller it can be. Knowing this will help you when you try to identify the source of the water hammer. So keep in mind that a small pipe may not be a problem if it is a very short length.
The second variable is time, or specifically how fast the water is being stopped. When a closing valve is causing water hammer, time is how long it takes for the valve to close. Most irrigation valves take several seconds to close. Theoretically this would not cause a problem, as several seconds is very slow when dealing with water hammer. The problem is that 80/20 ratio I mentioned previously. The valve may take a few seconds to go from full open to full closed, but it has a tendency to snap closed when it gets down to that last 20%. Realistically the actual closing time of a typical irrigation solenoid valve is around 1/2 to 1 second as best I can tell. But it varies greatly, even when testing the same valve. For example, an irrigation valve closes much faster if there is higher water pressure present. It also closes faster as you increase the flow through the valve (increasing the flow creates a greater pressure differential across the valve, which causes it to close faster.) So a valve that would not cause a water hammer problem at a low flow and low pressure, will cause all kinds of problems if you increase the flow through the valve and/or the water pressure.
The third factor that influences water hammer is the velocity of the water. The faster the water is traveling in the pipe, the greater the water hammer. It is this last factor which is easiest for us to correct in a sprinkler system, so most of the suggested solutions for water hammer will be aimed at reducing the water velocity.
Be aware that there are many "quick fix" devices that are supposed to fix water hammer problems for you. My experience has been that air vents, air traps, and water hammer arresters seldom work with automatic irrigation systems. Irrigation systems, particularly sprinkler systems, tend to have much more severe water hammer problems than that found in household plumbing. These devices are made to stop water hammer that is caused by household uses and they will often cure the problem in those cases. But I have never seen one fix water hammer caused by an automatic sprinkler system.
Now you need to do some detective work. Take the time to do some research. Listen for the water hammer noise. What's happening when, and especially just prior to, the time when the sound occurs? Water hammer is set off by something, it doesn't just occur randomly. Chances are a irrigation valve closes when the sound occurs. Closing irrigation valves are the source most of the time. Another frequent cause is the fill valve on a dishwasher or washing machine closing. Once you know what happens, you can focus in on it as the potential source of the problem.
Solutions for Water Hammer Caused by Washing Machines and Dishwashers:
If the noise occurs when a washing machine or dishwasher valve closes the problem is that the appliance is demanding more water than one or more of the pipes supplying to it can safely handle. We'll try the cheapest solution first.
- This is the cheapest solution but not really the best. I would only use it as a temporary fix. Try partially closing the shut-off valve for the appliance. Start by closing it half way. If that doesn't get rid of the noise close it a little more, keep repeating until the noise stops. Closing the valve reduces the flow to the appliance, and thus reduces the velocity in the pipes. Unfortunately many dishwashers and washing machines use a fill timer rather than actually measuring if the washer is full. Sometimes when you close the valve partially the washer doesn't get enough water and the clothes or dishes don't get clean. So check to see if closing the valve is creating cleaning problems. If it is, reopen the valve a little and try again.
- There should be a short tube that leads from the shutoff valve to a appliance. Often this tube is a piece of 1/2" hose or a 3/8" copper tube. This tube should not be more than three or four feet long, if it is longer the tube may be part of the problem, so try replacing it with a larger tube.
- The next trick to try is installing a AA-size water hammer arrester on the pipe at the shut-off valve. While these devices are seldom useful for irrigation systems, they often do work with appliances because the water demand is not nearly as high as a sprinkler system. You can get a water hammer arrester at just about any plumbing supply store. At your local hardware or home store look for a pre-packaged water hammer arrestor that attaches to a standard washing machine cold water outlet. The ones I have seen come in one of those clear plastic display packages, and look like a copper tube with hose connections. Check the return policy of the store before you buy it, will they take it back if it doesn't work? Make sure you keep all the packaging. Install it per the directions on the package. If you are installing it on a dishwasher fill, you will probably need some adapters to make it fit. If it doesn't work, remove it and return it.
- Air chambers are pretty much worthless, none of the building codes recognize them any more for water hammer control. An air chamber is just a long section of vertical tube with a cap on the top of it. The idea is that air is trapped in the tube and absorbs the water hammer shock. They may work for a while, but they become water-logged with time. They also need to be huge, generally at least 3/4" size and several feet long.. So if someone suggests one, I recommend not wasting your time and money.
- The last option is to tear out the walls or floors and install a new, larger pipe to the appliance. Before you do that run a test. Get a 3/4" heavy duty garden hose. It will cost a lot, but at least you can reuse it in the garden. Hook up one end to the flush outlet on your water heater, and connect your appliance to the other end. Then run the appliance, the water hammer should be gone. If the water hammer is still there, then the pipe in the wall is not the problem.
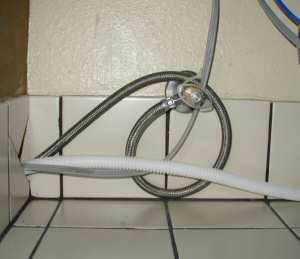
Typical dishwasher shut-off valve under a kitchen sink.
The silver tube looped around the valve is the water supply to the dishwasher.
Gray is the dishwasher power cord. White pipe is the dishwasher drain pipe.
Solutions for Water Hammer Caused by Irrigation Systems:
The easiest solution is to lower the water pressure for your entire irrigation system. This doesn't really get rid of all of the water hammer, but it will sometimes reduce it to a level you can live with. Of course often when you lower the pressure enough to stop the water hammer the sprinkler system stops working too. Lowering the pressure has two effects. It lowers the water demand of the sprinklers, which in turn reduces the velocity in the pipes. That actually reduces the water hammer. Lowering the pressure also reduces the overall surge pressure when the water hammer occurs. That simply reduces the severity of the water hammer, but doesn't get rid of it. To test if this will eliminate the noise, simply go to the main shutoff valve for the sprinkler system. (If your sprinkler system doesn't have a shut-off you will need to install one.) Close it down until it is about 50% closed. Now run the sprinkler system. If the water hammer is still there, close the valve a little more and repeat. Continue this until the water hammer goes away. When the water hammer is gone, check your sprinklers. Are they still operating correctly? If they are operating correctly the water from any single sprinkler should be spraying almost all the way to the adjacent sprinkler head (you need about 80% overlap of the water between sprinklers to keep from getting dry spots.) So if the sprinklers are 18 feet apart the water from each one should be covering an area at least 14.4 feet out from the sprinkler (18 x 0.80 = 14.4). If the water is not going far enough you will get dry spots, so this solution will not work. If the sprinklers seem to be still working good leave the valve partially closed for a few days. Do any other problems shown up? Like the showers don't work in the house or dry spots show up in the lawn? If not you should go to the plumbing store and buy a good quality, brass bodied, adjustable pressure reducing valve. Install it right after the shut-off valve that you partially closed. Then open the shut-off valve fully and adjust the pressure reducing valve until the pressure is at a level where the sprinklers work right but the water hammer isn't a problem. You should not leave the shut-off valve partially closed for more than a couple of weeks. Most of those valves are not designed to be left permanently in a partially closed position. Also the pressure reducing valve is designed to compensate for changes in the incoming water pressure to your house. The shut-off valve can't do that. If only one valve zone of the sprinkler system creates water hammer you can try partially closing the flow control stem on the irrigation control valve. If that works, the flow control may be left in a partially closed position permanently, it will not harm the valve.
If you have an automatic sprinkler system you may be able to get rid of the water hammer by simply changing the order in which the valves operate. Simply find out which valve uses the least water. This will probably be the one with the least sprinklers, but not always. Some sprinklers use more water than others. Once you know which valve uses the least water, rewire the controller so that the valve that uses the least water is the last valve to run. If you don't know which one uses the least water just try all of them in the last position. Since water hammer is directly related to flow, the valve that uses the least water is much less likely to cause water hammer when it closes. The reason putting this low flow valve last works is because most irrigation valves close slowly. So typically valve #4 will not have completely closed when the next valve, #5, opens. So when valve 4 snaps closed it creates a shock wave (water hammer), but the wave passes harmlessly out of the system through valve circuit #5. Don't worry if you didn't understand how that works, just try switching the valve order on the controller and see if it gets rid of the water hammer problem! (My thanks to Larry Welch for pointing this trick out to me!)
The next step is to try a water hammer arrestor. As noted before, this often doesn't work with sprinkler related water hammer, but it's worth a try. At your local hardware or home store look for a pre-packaged water hammer arrestor that attaches to a standard washing machine cold water outlet. The ones I have seen come in one of those clear plastic display packages, and look like a copper tube with hose connections. Check the return policy of the store before you buy it, will they take it back if it doesn't work? Make sure you keep all the packaging. Install it per the directions on the package, try putting it on a hose bib close to the point where the irrigation system connects to the house water. If you have a hose bib on the irrigation system mainline, that is an even better place. Or you can tap into the irrigation mainline to install it. If it doesn't work, remove it and return it.
If the noises were caused by an irrigation valve, then it is likely that someplace between the water source and that valve the water velocity is too high. Too much water is trying to squeeze itself through the pipe. To get through the pipe the water moves faster (higher velocity) and the faster it goes, the worse the water hammer gets. You have to reduce the speed of that water to get rid of the water hammer. Here are some ways to do that.
The irrigation valve may be too small. This is seldom the problem, but I mention it because it is possible. If the valve is the same size as the pipe it is installed on (say, 1" pipe with a 1" valve) then it is extremely unlikely that the valve size is the problem. If the valve is one size smaller than the pipe (say, 1" pipe with a 3/4" valve) then there is a very small chance that the valve is the problem. It is normal to use a valve one size smaller than the pipe, so this is still is not very likely a problem. If the valve is a couple of sizes smaller than the pipe then there is a reasonable possibility that a larger valve will fix the problem. Also, cheaper valves often snap closed faster than more expensive ones. So a cheap undersized valve might be a good possibility as the water hammer source. It might be worth the effort of replacing the valve.
This next option was once a good one, but now it seldom works because very few of these old sprinklers are still around. Really old sprinkler systems (15 years or more) used sprinklers heads that had a much higher water demand than today's sprinklers. Typically these sprinklers were made of solid brass. Thanks to engineering advances newer sprinklers have similar performance but use much less water. You could try replacing the old sprinklers with the new, low-flow sprinklers. Start by doing some research. Note the sprinkler manufacturer's name and the sprinkler model number of the existing sprinklers and do a search for that name and number on the Internet. If the sprinkler is no longer made that's a good sign. If you can find it check with the manufacturer to find out what the GPM of the sprinkler is. GPM is the gallons per minute of water the sprinkler uses. Next check how far apart the sprinklers are installed from each other. Take that number and multiply it by 0.80. So if the sprinklers are 18 feet apart you will get 18 x 0.80 =14.4 Round up, so use 15. The replacement sprinkler will need to have a radius equal to that number, so in this case it will need a 15 foot radius (not diameter). Go to the store and look for sprinklers that cover that radius. Then check the GPM demand of the new sprinklers. If they use less water than your current sprinklers you can replace the old sprinklers with new ones. It may get rid of the water hammer. It may not. But even if it doesn't work you get a better irrigation system. Note that if you are using pop-up sprinklers always use the ones with retraction springs. I recommend at least a 3" pop-up height to reduce maintenance problems.
Splitting valve zones is another method of getting rid of water hammer. If only one of the irrigation valves is causing water hammer the easiest solution is to reduce the amount of water that valve is using. That will reduce the velocity and the water hammer will stop. To do that you need to reduce the number of sprinkler heads the valve operates. The easiest way to do that is usually to install a second valve and connect half the sprinklers to it. That's likely going to mean doing some trenching and installing some new pipe. So before you do that, you should run a simple test to make sure it will fix the problem. Remove half the sprinklers controlled by the valve and put a cap on the pipes where they were. Now turn on and off the valve several times to test for water hammer. If possible test the valve multiple times at different times of the day over a period of a week. If the water hammer only occurred at certain times of the day be sure to test at those times. For example, often water hammer problems are much worse at night, so it's a good idea to test a couple of times late at night. If the water hammer is gone, it worked! If the water hammer is still there you may need to remove even more sprinklers. If you remove all the sprinklers and the water hammer is still there, that valve is obviously not the problem! If the water hammer goes away when you reduce the number of sprinklers, then you will need to install a second valve and pipe to provide water to the sprinkler heads that were removed. Make sure the second valve has the same number or less sprinkler heads as the original one. You don't want to create another water hammer problem! You may even have to install 3 valve circuits where there was one originally.
If the water hammer occurs when several valves close you can split each of them into two or more valves as described above. But you may find that it is easier to install a new, larger pipe to all of the valves. Remember, when water hammer occurs due to a closing valve it is because the water is going too fast in a pipe someplace on the upstream side of the valves. In order to understand this next procedure you need to be familiar with the relationship between your house plumbing and your sprinkler system and you need to know some terminology.
- Your water comes to your neighborhood in large "water mains" (pipes), usually located in the street, that supply the entire neighborhood with water. These pipes are owned by the water provider.
- From the water main a smaller pipe known as a "gooseneck" carries the water to your property line. This is also owned by the water provider.
- Often there is a buried valve known as a "corporation stop" at the point where the gooseneck reaches your property. There may also me a water meter right after the corporation stop. In northern climates the water meter and maybe even the corporation stop will be installed within the house (usually in the basement) to protect it from freezing. The corporation stop marks the end of the water company's pipe and the start of your private household pipe.
- The pipe from the corporation stop to the faucets in your house is the "house water supply pipe". This is usually a single pipe that branches off to all the faucets when it gets inside the house.
- The pipe running from the house water supply pipe to the irrigation system valves is called the "irrigation mainline". The irrigation mainline connects to the house water supply pipe at some point. Where is anyone's guess, I've seen just about every possibility over the years. There should be a shut-off valve at the point the irrigation system connects to the house water supply. Should be... but often there isn't. If there isn't you should consider adding one.
So now it's time for more detective work. (In this case detective work also means "hard work".) You need to check all the pipes the water passes through on the way from the water main to the valves to see if there is a "bottleneck"-- a section of pipe that is smaller than the others. You will need to check all of the pipes previously mentioned; the gooseneck, the house water supply pipe and the irrigation mainline. You only need to check the pipes in a direct line between the water provider's water main and the source of the water hammer (most likely the irrigation valves.) To understand this think of all the pipes as if they were roads. Imagine you want to "drive" from the water main to the irrigation valve and you want to take the most direct route. The water also will take the most direct route. So the pipes you want to check are those on that direct route. Don't worry about any pipes that branch off to elsewhere. The water won't take any side trips to see the local sights. Like I said, this is going to take some detective work to figure out which pipes the water is going through and where they are! This may require digging a lot of small "test holes" to find buried pipes and determine what size they are. If you are lucky, you will find a section of pipe that is smaller than the others. This is likely the source of the problem, replace it with a bigger pipe. Remember, any of the pipes may be the one that is too small. It could be the gooseneck, the house water supply pipe, or the irrigation mainline.
Here's a quick tip: if the irrigation mainline hooks up to the location of a former hose-bib on the side of the house, the pipe leading to the hose-bib is almost always the problem. Typically when the house is built, the plumber just runs a 1/2" pipe to hose-bibs to save money. A 1/2" pipe is big enough for a hose to water the Petunias, but not big enough to supply a sprinkler system! . Unfortunately many do-it-yourself sprinkler installers do not know this, and some of those stupid "design your own sprinkler system" brochures you get at the hardware store even show people using a hose bib to connect the sprinkler system to. A lot of sprinkler system repair guys have gotten rich thanks to those stupid brochures! Stupid, stupid brochures! OK, I need to calm down and get back on track.
There are numerous materials that pipe is made from. The most common are copper, steel, galvanized steel, PVC, polyethylene, and a new product called PEX.
- PVC is usually white (sometimes gray) colored plastic.
- Polyethylene (also Polybutylene) is normally black. Polyethylene, often called "poly" or "PE", is more soft and flexible than PVC, and has a slightly "oily" feel. You can scratch poly with a fingernail, but not PVC (unless you're using that "tough nails" stuff on them, in which case you can use them to rip out concrete.)
- Copper is copper colored when new but often turns green if exposed to the weather.
- Steel looks like, um..., steel. You know what steel looks like, right? A magnet sticks to steel but not copper.
- PEX is a type of polyethylene, it is flexible like the Polyethylene, but much stronger. It will normally say "PEX" on it, and be a color other than black. Often it is white or blue. and may look a lot like PVC, especially if it is old and dirty! In the absence of the words PEX on the tube, check the diameter of the tube. PEX is typically made to have the same outside diameter as copper tube. Another way to tell is to look for the fittings that connect plastic (non-threaded) pieces together. PVC pipe will be glued together, PEX tube will use barbs with clamps, or compression fittings. If still in doubt, go to a plumbing supply store and check out actual samples to compare with what you have.
To determine the size of the pipe, grab a piece of string about 6"(152mm) long. Strip away any insulation on the pipe, so you can get at the pipe and wrap the string around it. Measure how many inches of string it takes to go around the pipe once. The string length is the circumference of the pipe (yikes, bad memories of high school geometry!). Using the circumference we can calculate the diameter of the pipe, which allows us to calculate the pipe size, zzzzzzzzzz..... Let's forget all those calculations! Based on the string length use the table below to find your pipe size.
For Copper and PEX Tube & Pipe
2.75" (70mm) = 3/4" pipe
3.53" (90mm) = 1" pipe
4.32" (110mm) = 1¼" pipe
5.10" (130mm) = 1½" pipe
For Steel Pipe or PVC Plastic Pipe
3.25" (83mm) = 3/4" pipe
4.00"(102mm) = 1" pipe
5.00"(127mm) = 1¼" pipe
6.00"(152mm) = 1½" pipe
For Flexible Polyethylene Pipe
2.96-3.33" (75-85mm) = 3/4" pipe
3.74-4.24" (95-108mm) = 1" pipe
4.90-5.57" (124-141mm) = 1¼" pipe
5.70-6.28" (145-160mm) = 1½" pipe
So what if you didn't find a pipe that was smaller than the others? In this case all of the pipe may be restricting the flow. To fix it you may need to replace all of the pipe. But I would suggest that you start with the pipe that would be easiest to replace. After you replace it test for water hammer. If it is gone, great! If not, go to the next section of pipe. Chances are you can't replace the gooseneck, since it does not belong to you. Fortunately it is often a short length running just from the water main out in the street to your property line. If it is very short like this the water hammer may well go away or be greatly reduced without replacing it.
There are two ways to fix the small pipe problem.
- One way is to remove the small pipe and install a larger one in it's place. If you replace the existing pipe I suggest that the new pipe be two sizes larger than the old one, just to be safe. Using a pipe two sizes larger will not harm anything and it will not reduce your water pressure. See the discussion of pipe sizes at the bottom of this page.
- The other way to reduce the velocity in the small pipe is to simply install a second pipe next to it and run the water through both pipes. Using this second method results in half the water going through each pipe, so the velocity in both of them is much lower. This is usually cheaper to do than replacing the pipe. The second pipe should be equal in size or larger than the original pipe. Tap the new pipe in as close as you can to the ends of the existing small pipe. This will leave you with a short section of small pipe on either end, which will cause some flow restriction. However it probably will not be enough to cause water hammer. The restriction caused by this short section of small pipe would be similar to that found when the water passes through a standard valve, which also restricts the flow.
Now one last thing. Since we are essentially guessing that the small pipe is the source of the problem, I can't promise you that replacing it will get rid of the water hammer. Unfortunately there is not an easy way to test this method without actually installing the new or second pipe. If the pipe you are thinking of replacing is buried, before going to a lot of work digging up pipes, try a test installation with the new pipe on top of the ground. Then test for water hammer. If that fixes the problem, then you can dig a trench and put the new pipe in the trench.
For reference, here are the common pipe sizes available in the USA: 1/2", 3/4", 1", 1 1/4", 1 1/2", 2".
Impact of changing to a Larger Pipe Size:
Did someone tell you that using a larger pipe will reduce your water pressure or make things "not work right"? One of my (many) pet peeves is that a lot of people in the industry will tell you that you need smaller pipes because "the smaller pipe squeezes the water and creates more pressure". No, no, no! It doesn't work that way! Using a larger pipe size will not reduce the water pressure or hurt your irrigation system or your house water system. There is a common misconception out there that if you use a bigger pipe the water pressure will be reduced and the sprinklers and your washing machine will stop working. This is not true and I am on a personal campaign to kill this ugly myth!. So please forgive me for ranting a little. It is a lie! An old sprinkler installer's tale. Anyone who tells you this doesn't know what he or she is talking about. Now every time I write this I get flamed by someone in the industry who doesn't agree. Instead of flaming me, I challenge you to simply prove me wrong! Do a little research. Look up the Bernoulli principle and you will see that it says that if flow is constant the water pressure decreases as the pipe gets smaller. You can even try it yourself using a fun, online interactive toy built by physicist Mark Mitchell located here. (Warning this page loads slow and requires JavaScript. But it is worth the wait!) The bottom line is that you can't "squeeze" more pressure out by using a smaller pipe. Let's face facts, misunderstanding this is probably the problem that got the small pipe there in the first place. So you already have problems because someone bought into that lie, don't repeat the error! It's so important I'm going to repeat it. You can't hurt your system by using a larger pipe. But if the new pipe isn't big enough, you will still have water hammer and that will hurt your system. Remember, this is a very common myth. I have even heard from readers who tell me that the tech support people at a major sprinkler manufacturer have been spouting this little untruth. I sure hope that it wasn't true. If you talk to someone at a tech support line and they tell you this myth, please ask them nicely to check their facts. They need to stop spreading these false theories or more people are going to wind up with water hammer problems. Now with all that said, there is a rare reason for using a smaller pipe. I wouldn't mention it but some other expert will call me on it if I don't. Sometimes the water is going through the pipe so slowly that silt and other stuff in the water settles out and slowly plugs the pipe. The higher velocity in a smaller pipe keeps stuff from settling out. But this is a very, very, very unusual situation. If you are having water hammer problems there is almost zero chance of this being an issue for you. Your problem is high velocity, not low velocity.