Irrigation Pump Tutorial
Tips for Buying a Pump
Page 3
<<< Back to page 1 <<< ||| <<< Back to page 2 <<<
Tips for Buying a Pump
If you call your pump dealer and give him/her the feet head (or even the PSI) and GPM you want to pump, he (she?) will figure out which pump you need. This is the best way to select a pump, as the dealers know their pump lines much better than you. They may suggest a pump you don't even know about. But for those who want to be educated consumers, here is how to do it yourself!
I do not generally recommend that you buy an "off the shelf" pump at a hardware store for use on an irrigation system. Most of those pumps do not provide sufficient performance information for you to be able to tell if the pump is sufficient for your system. Off the shelf pumps are fine for fountains, draining a pool, running a sprinkler on the end of a hose, or other uses that don't require precision. The wasted power used by the wrong size pump on an irrigation system can easily cost you far more than the savings you get from buying a discount pump. If you guess wrong and the pump isn't big enough, you will become one of those poor people trying to unload a brand new pump at a huge discount on Ebay!
Pump Curves
A pump curve is a simple graph which shows the performance characteristics of a particular pump. Pump curves are created by the pump manufacturer based on test results of the various pump models the manufacturer produces. The pump manufacturer should be able to provide you with performance curves for the pumps you are considering. Remember, there is always an inverse relationship between pressure and flow. Higher pressures mean lower flows. Lower pressures result in higher flows. Here's a sample pump curve for study:
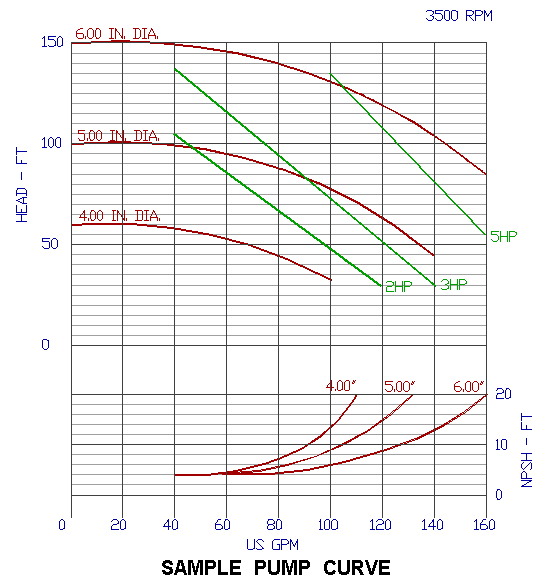
Pump Curve is for a Centrifugal Type Pump
OK, that was a big help, right? No? OK, so how in the world do you use the thing? Glad you asked! Here's a step by step guide to the pump curve above. The pump curve above is for a centrifugal type pump as these are the primary type used for irrigation.
Each pump curve typically reflects a single model of pump made by the manufacturer. At the top right of the chart you will notice it gives the pump speed, in the chart above this is 3500 RPM. It is said that higher speed pumps wear out faster, but to be honest, I have never noticed a difference. I pretty much ignore the speed and try to select the pump with the best performance for my needs.
For each model there are two variables which effect the pump performance. The first is the horsepower of the motor attached to the pump. Remember, what we commonly refer to as a pump is actually a pump and motor. The pump is the part that moves the water, the motor is the part that moves the pump! Most pumps can be attached to several different sizes of motor. Bigger motors mean more volume and pressure.
The second variable is the size of the impeller. As you remember the impeller spins inside the case and this is what moves the water. Larger impellers fit tighter in the case leaving less room for slippage. This results in higher pressures. But you don't always want higher pressures, as pressures higher than what you need just waste energy!
Look at the left side of the curve and you will see a label HEAD - FT and numbers starting with 0 and increasing as you move up the chart. This is the pressure that the pump is capable of producing, measured in feet of head (not PSI!). The bottom of the curve is labeled US GPM. This is the flow that the pump produces.
Finding the proper pump is just a matter of selecting a model and size that will produce both the head and GPM that you need. To do this you select the horsepower and impeller size that will give you the desired performance.
Using the Curves
Notice the red color curved lines (the top one in the pump curve above is labeled "6.00 IN. DIA."). These represent the various impeller sizes. Now notice the green color straight lines which intersect the impeller curves (the top one in the pump curve above is labeled 5 HP). These lines represent the motor horsepower ratings available for this pump. Together the impeller curves and horsepower lines represent the best performance the pump is capable of if that horsepower or impeller size is selected. Some pump curves do not have horsepower lines, and some pump curves combine the horsepower and impeller lines into one single line. This is usually because the pump only is available with one motor, so you don't get to select the horsepower. The pump may also only come with one size of impeller, so you will only see a single line on the entire pump curve!
To use the curves you select the pressure you want on the left and then move horizontally across the chart to the vertical line that corresponds with the flow (GPM) that you want. You then select an impeller size curve and horsepower line that are above this point to determine the impeller size and horsepower you will need for your pump.
The following examples are based on the pump curve above.
Example #1: You want a pump that produces 125 feet of head while pumping 100 GPM. Start at 125 ft. hd. on the left of the pump curve. Now move straight across the curve to the right until you reach the line that goes down to 100 GPM on the bottom of the curve. From the point where the two lines intersect move up the chart to see what horsepower pump will be needed. In this case a 5 HP will be needed as the next horsepower line above our intersection point is the 5 HP line. Likewise, the impeller curve must also be higher in the chart than our line intersection, so a 6.00 IN. DIA. impeller will work.
Example #2: For 70 ft. hd. and 80 GPM. Make a mark at the point where the horizontal 70 ft. hd. line intersects the vertical 80 GPM line. This point is just above the 2 HP line, so a 2 HP pump will NOT work. We will need to use a 3 HP motor. The next higher impeller size is 5.00 IN. DIA. so we could use that impeller (but we might not, see "custom impellers "below).
Tutorial continues below...
Custom impellers
If you order it, they will build it! Pumps can be ordered with custom impeller sizes. In fact, this is the most common way pumps are sold. This often does not cost much more than a "off the rack "pump, but it does take a little longer to get the pump since they need to custom build it! Almost all of the pumps I use have custom impeller sizes. To determine the custom impeller size you simply draw a new impeller curve through your ft. hd./GPM intersection point so that the curve is parallel to the other impeller curves. Then you determine the impeller size by comparing your new curve with the other impeller curves. For example, if your new curve is midway between the 5.00 inch curve and the 6.00 inch curve then you would need a 5.50 inch impeller! The good news is that you don't really need to do this, when you order the pump the manufacturer will ask you what your feet head and GPM requirements are and they will calculate the best impeller size for you! Then they will grind one down to the correct size for you. Now that has to make you feel pretty important. Plus, you get bragging rights; "I had this pump custom built for my yard, it's one of a kind!"
Pump Efficiency
On many pump curves you will see an additional set of ellipses labeled "efficiency "or simply with percentages labeled on them. For clarity I left these off of the example pump curve. These ellipses indicate the efficiency of the pump. To use them you simply look for the smallest ellipse that your line intersection point is inside. This is the efficiency at which the pump will operate. The higher the efficiency the better! A high efficiency pump uses less energy ($$$) to operate than a low efficiency pump. If possible, it is best to avoid any pump that has an efficiency of 55% or less. 55% efficiency is the industry standard used to estimate the performance of a pump when the actual efficiency is unknown.
Read the Manual
All pumps have oddities and special and unique requirements. Before installing a new pump always read the Owner's Manual. Please...?
Pump Controls
When I was a child, my parents owned a one room fishing cabin on the banks of the Rogue River in the town of Shady Cove, Oregon. This was a pretty primitive place, and our source of water was a small 120 volt electric pump in the river. On the inlet side of the pump a 5' long garden hose extended into the river, with a piece of window screen on the end to keep out most of the fish. The pump outlet was connected to a standard garden hose that ran up the bank from the pump to the cabin area. When we needed water we simply plugged in the extension cord that ran to the pump and moments later, after a few gurgles and burps, the water would start flowing from the hose. To turn the water off we simply unplugged the cord. This is an example of the most basic of pump control systems, and yet all pump controls are no more than a variation on this same procedure. The pump is started and stopped by turning on or off the power supply!
The next step up in pump control is to get rid of the plug and outlet and use a permanent switch to turn on and off the power flow. Some small pumps are stopped and started in exactly this way. But with the higher voltage and amperes commonly used for irrigation pumps a simple switch will not be practical. The switch would have to be huge to handle the load. Add to this the safety problems that develop when you add water to the equation. While 110 volts can kill you, contacting it with dry hands will likely only give you a bit of a "bite". Grab that same voltage with wet hands and there is a good chance your heart will stop, or at the least you will wish you had stayed in bed that day! Water makes your skin a much better conductor of electricity. Remember that little childhood trick your friends pulled, involving the 9-volt battery and your tongue? If you press the battery terminals on your skin nothing much happens. But lick your skin before trying it (I don't recommend sticking the battery terminals directly on your tongue!) and you will hear and possibly feel the spark jump! That's what water does with 12 volts and a fraction of an amp. Believe me when I tell you that the 24 volts and 2.5 amps put out by most automatic irrigation controllers will make you say some pretty unnice things if you grab the wrong two wires with wet hands. Imagine, then, the effect if you increase the voltage to 240 volts and 15 amps! (By the way, it's the amps that kill you, not the voltage!) For this reason most pump control circuits are designed using a relay circuit that isolates the user from the pump voltage. The relay circuit is like a messenger. You tell the relay to start the pump and the relay starts it for you. Most relays use 12 or 24 volts, a few use 120 volts. For example, the controls for spas usually use a 24 volt relay circuit because the manufacturers know you're going to be turning them on and off with wet hands.
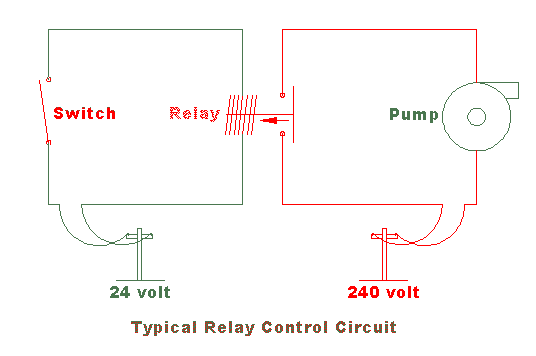
Basic Pump Magnetic Relay Control.
Automating the Control Circuit
To automate the control of the pump you simply replace the manual switch in the circuit with an automatic switch. There are several types commonly used.
Types of Automatic Pump Switches:
- Timer. Any electric timer can be used to turn the pump on and off at predetermined times. A relay is used to start and stop the high voltage pump using a low voltage timer, like a standard irrigation controller. With the right voltage relay, you could even hook the pump up to your computer!
- Pressure Switch. Most well pumps are controlled by a pressure switch. The pressure switch turns on the pump when the pressure drops in the pipes, and turns it back off when the pressure gets too high. A typical installation will have a pressure tank which stores pressurized water so that the pump doesn't cycle on and off rapidly due to pressure changes. The tank acts as a reservoir to stabilize the pressure in the system. Most pressure switches are adjustable, you can modify the on and off pressure settings within a limited pressure range, usually 20 to 45 PSI.
- Irrigation Controller. Most irrigation controllers have a pump start circuit built into them. You simply connect the wires that go to the switch in the diagram above to the controller pump start terminals, and the irrigation controller will turn the pump on whenever it turns on a valve. Do not hook up the controller to an existing relay circuit. In other words if your pump already has a low voltage starter circuit with a relay you will need to install a new one for the irrigation controller. The controller has its own 24 volt AC power source, so if you hook it up to an existing circuit the irrigation controller may be damaged. If you don't understand electrical circuits get an electrician to wire it for you!
- Flow Switch. Flow switches are sometimes used on booster pumps. When the switch detects flow in the pipes it turns on the pump. So if you open a sprinkler valve, the water would begin to flow, and the pump would come on. This only works if the water is already pressurized and you want to use the pump to increase the pressure. An example would be a sprinkler system hooked up to the local water company pipes that needs more pressure than the water company provides.
- Combination of one or more of the above switches. It is very common to combine one or more of the switches above so that the pump is turned on or off by any of several different events. A very common application is one relay controlled by both a pressure switch and a manual override switch, and a second relay operated by the irrigation controller. I often will add a flow switch to the irrigation controller relay, setting it to turn OFF the pump if there is no flow. For example, if one of the automatic valves fails to open when the controller tells it to, the irrigation controller would force the pump to continue running, even though there was no water flow! The pump would then over heat, since it uses the continuous flow of water through it to remove the heat, and the bearings would melt.
Well, that's it. You hopefully now know a lot more about pumps than you did previously. With this information digested, you are ready to drop into your local pump store (or two or three, get multiple estimates!) and talk intelligently with the customer service representative about which pump model is best for your needs.
Technical note: In order to simplify the pump formulas I have factored a pump efficiency of 55% into the value of the formula constant (2178). This is pretty standard procedure, and is a relatively conservative value. Although a new pump will almost always perform better, remember that the performance will drop with time as the pump begins to wear out.
<<< Back to page 1 <<< ||| <<< Back to page 2 <<<